FCUS Pre-reading: Introduction and Image Optimisation
Introduction
Since the introduction of portable ultrasound, focused or point of care ultrasound (POCUS) has achieved widespread acceptance in the critical care environment. It has revolutionised the bedside management of a number of conditions, particularly with regard to the assessment of shock, breathlessness & fluid status.
This manual & the course provide an introduction to the field. They are designed for the critical care sonologist who has already achieved proficiency in basic focused US (e.g. basic physics and image acquisition, EFAST, AAA and basic procedural guidance).
This course offers a mixture of lectures and practical skills sessions.
The key educational objectives are:
1. Knowledge
To introduce participants to basic Focused Cardiac UltraSound:
- Image acquisition & interpretation in:
- Basic echocardiography
- IVC & volume status assessment
- Lung US
- Synthesis of findings in the critically ill patient
- Pitfalls & limitations of basic CCUS
2. Skills
To provide an opportunity to demonstrate the following US skills in the critically ill patient:
- Image acquisition
- Image identification
- Synthesis of findings
3. Certification
This course is accredited for the following modules:
• Echocardiography in Life Support (Australasian College for Emergency Medicine)
• Echocardiography in Life Support (CCPU, Australasian Society for Ultrasound in Medicine, in development)
• Lung (CCPU, Australasian Society for Ultrasound in Medicine) (in development)
What is critical care ultrasound?
A rapid, patient-focused bedside US scan. This point is critical: unlike traditional formal US (and even many ED applications such as foreign body localisation), CCUS does not focus on a specific organ or region. Instead, it addresses physiological questions, namely:
- Why is the patient arrested?
- Why is the patient breathless?
- Why is the patient shocked?
For this reason, the critical care sonologist may scan regions as diverse as the lungs, the heart and the limb veins (for venous thromboembolism) or simply the inferior vena cava and abdomen (for clinical suspicion of septic shock and cholecystitis).
Because we are clinicians,our clinical assessment must come first (see the golden rules below). CCUS, like all point of care US (POCUS), is useless without a good clinical assessment and a clear focused question guiding it.
CCUS should usually begin by scanning one or more of the lungs / heart / IVC in the first instance, and include other body regions as appropriate.
Another important point is that the initial CCUS is a rapid screening test. It is designed to be performed within a few minutes at most, and to assist resuscitation and stabilisation. This is because ‘ultrasound findings in the critically ill are caricatural’ [D Lichtenstein]. We are not looking for subtle pathology. For example, the CCUS will often miss a small pneumothorax but it will always pick up a large one.
Once the patient is stabilised, the CCUS gives way to the more thorough, more prolonged scans such as transthoracic echocardiography or formal lung ultrasound.
Comparison of formal transthoracic echocardiography (TTE) and CCUS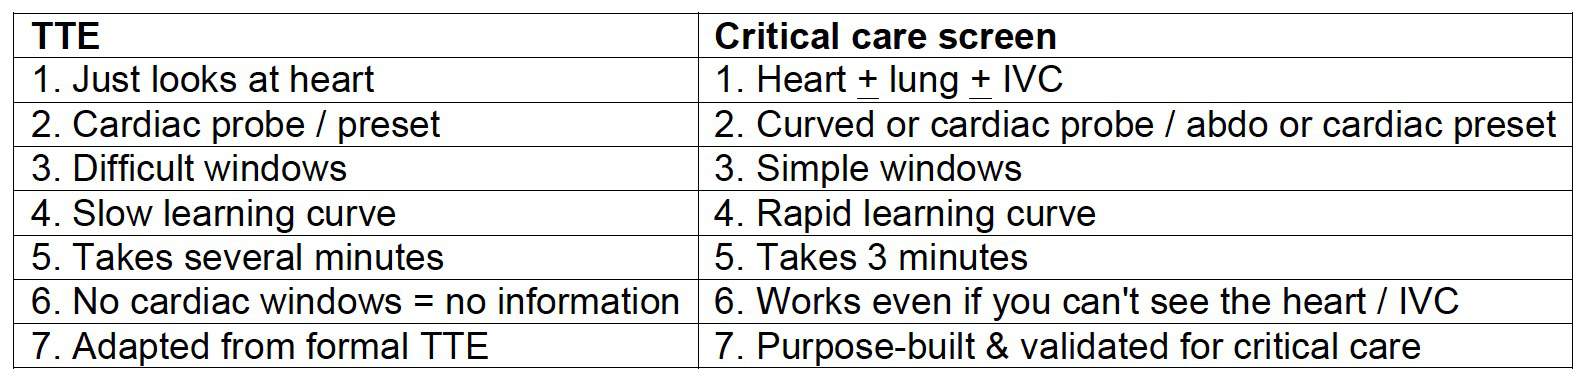
Limitations of critical care US screen
- Not a substitute for formal scans:
- Doesn’t use M-mode or Doppler
- Doesn’t look for LV diastolic function, valve disease or subtle disease
- It includes other windows & other organs to synthesise the answer
2. Algorithm only validated in critically unwell patients, not in those with minor degrees of illness (e.g. mild CCF)
3. Patient: suboptimal position & still being resuscitated!
4. Time (none!)
5. Sonographer
- Image acquisition
- Image interpretation
Therefore we need to follow certain rules…
The seven golden rules of critical care US
1. ‘Resus only’:
- Patient must be critically unwell:
- shocked / breathless / peri-arrest. That’s because the US signs of some of these diseases are only reliably present if severe e.g. massive PE, severe pneumonia. If formal studies are needed after resus, get them.
2. Clinical context is paramount. Make a differential diagnosis list before you switch on the machine. All data must be considered (e.g. FBC with Hb = 4).
3. Only ask questions that you can answer. Leave the fancy stuff (e.g. valve disease) to others.
4. Repeat scans are crucial during resuscitation & each time clinical picture changes.
5. 90% = 100%: Every test has its limitations. In a peri-arrest patient, no study will be 100% accurate. If this bothers you, don’t practise critical care.
Respiratory physician: “Would you really thrombolyse a critically ill patient with suspected PE on the basis of bedside US?”ED physician answer: “I spent years doing just that without the benefit of US. Anything that improves my accuracy must be good.”
A CONVERSATION WITH JB
6. When in doubt, be a doctor. You were a clinician before you were a sonographer. If the clinical picture & scan findings don’t agree, believe the clinical picture. “What would I diagnose if I didn’t have an US machine?”
7. A fool with a stethoscope will be a fool with an ultrasound. (Thanks to my co-author Dr Russell McLaughlin for this gem)
Image optimisation for critical care US
NOTE: this section assumes that you are already familiar with the basic principles of ultrasound physics and instrumentation, including common artefacts.
This section covers the following topics:
How to improve your images in CCUS
- The right patient position
- The right probe & preset
- The right orientation
- Line density
- Three tricks to increase your frame rate in cardiac imaging•
- M-mode
- Doppler
1. The right patient position
General principles:
- A critically ill patient can’t move much: what you see is what you get
- But don’t be afraid to move the patient if you can.•
Specifics:
- Heart: left lateral improves image quality for cardiac imaging
- IVC: moving the patient affects IVC caliber, so take this into account
- Lungs: whatever the patient position, the same principles apply
- Air rises (a pneumothorax will be seen in the least dependent portions)
- Fluid sinks (an effusion will be seen in the most dependent portions)
- Consolidation tends to be more pronounced in the most dependent portions too
2. Which probe, which preset?
Vascular Access
Probe: Linear array probe
Preset: Vascular / venous pre-set
Abdomen: FAST, AAA, Early pregnancy
Probe: Curved (sector probe nearly as good)
Pre-set: Abdominal
Lung
Probe: Are you in a hurry? Or performing a screening scan such as EFAST/CCUS? The curved probe and sector (cardiac) probes are probably as good as each other. Every clinician sonologist has his/her preferences (mine is the curved probe on the abdominal preset) but there’s no strong evidence either way. It’s worth noting that the father of lung US, Daniel Lichtenstein, advises that a microconvex probe is best so try it if you have one.
DON’T use the linear array probe if you can help it. It won’t show anatomical relations (e.g. you might place the probe on the liver and think it’s consolidated lung). Are you looking for artifacts (sliding and B-lines)? Once again, avoid the linear probe. Its ability to image structures in fine detail means it tends to obliterate artifacts! This is particularly true for B lines. By contrast, the very curvature of the images when the curved /sector probes are used tend to bring out the B lines, making them more obvious.
Are you looking for very fine detail e.g. pleural thickening, small areas of consolidation or tiny pneumothorax? Finally a role for the linear array probe! It is uniquely suited to imaging very superficial structures (in this case the pleural surface and subpleural pathology). The curved probe is not bad here either.
Avoid the sector probe for fine imaging at the lung surface. Although it fits between ribs & gets around the back, its poor spatial resolution and poor near field detail make it the worst choice here.
Pre-set: Some machines come equipped with lung presets, although you can ‘do it yourself’ by:
1. Selecting abdo / FAST preset
2. Turning off the fancy filters: THI (tissue harmonic imaging) and compounding/ multibeam (MB): because they make the artifacts harder to see.
IVC
Probe: Curved probe is best for image quality and anatomy; sector probe is OK if already switched on (e.g. for TTE) … and is probably better for imaging between the ribs (e.g. for imaging the IVC from the right upper quadrant)
Pre-set: Doesn’t matter
Initial Screening View Heart
Probe: Either curved or sector probe is adequate (subcostal window is best if using the curved probe)
Pre-set: Whatever preset you’re already on is fine (Abdo / FAST / cardiac)
‘Proper’ focused cardiac US or Trans Thoracic echo (TTE)
Probe: Sector probe: its small footprint allows it to fit between the ribs
Pre-set: Cardiac preset (image ‘round the wrong way’)
The right orientation
LUNG
Nothing beats a vertically oriented probe. You can image the ribs (your landmarks) and quickly find the pleural surface. Some prefer to scan parallel to the ribs to expose more lung, and there are no hard and fast rules. But think about it: if you are scanning parallel to the ribs, and you see an echogenic line without any sliding, is it a PTX … or is it just the rib?
HEART
This depends on the window. It’s tricky, so more on this later.
- Subcostal window: probe held transversely.
- Parasternal long axis (PLAX): probe placed just to the left of the sternum, along an imaginary line traced from the right shoulder to the left elbow.
- Parasternal short axis (PSAX): probe as for PLAX but rotated 90 degrees clockwise from PSAX: this time along an imaginary line traced from the left shoulder to the right elbow.
- Apical: probe placed at apex beat:
- Transversely for 4-chamber / 5-chamber view
- Sagitally (almost) for 2-chamber view
IVC
Like all blood vessels, its diameters and change with respiration are best viewed and measured in the transverse plane in B mode. That doesn’t stop people recommending the longitudinal plane in M mode, and it looks sexy, but it’s too open to observer error.
4. Line Density
- Usually we don’t touch this. But it can be useful to improve your cardiac images.
- This control basically sets how many ‘lines’ of data make up your US image.
- But it’s a trade-off: the more lines of data on screen, the better the image looks = better spatial resolution …but the longer it takes the probe to ‘draw’ the image. That leads to a slower frame rate and means that fast-moving structures look all blurry.
- Whereas a lower line density means the machine can ‘draw’ the image more rapidly and this allows a better temporal resolution (= great frame rates for crisp images of cardiac valves) but a generally crappier image all round (= lower spatial resolution).
- So:
- A high line density is desirable for high resolution imaging of small parts (thyroid, breast, testes etc.).
- A lower line density is useful in cardiac applications as it allows significantly higher frame rates.
5. Three tricks to increase your frame rate in cardiac imaging
These will make your images of fast moving stuff (e.g. the valves) much crisper
- Decrease the depth (that means the probe wastes less time trying to image stuff that’s not important, and can create the onscreen image faster)
- Zoom the area of interest (for the same reason)
- Shrink the sector width of the area scanned (for the same reason)
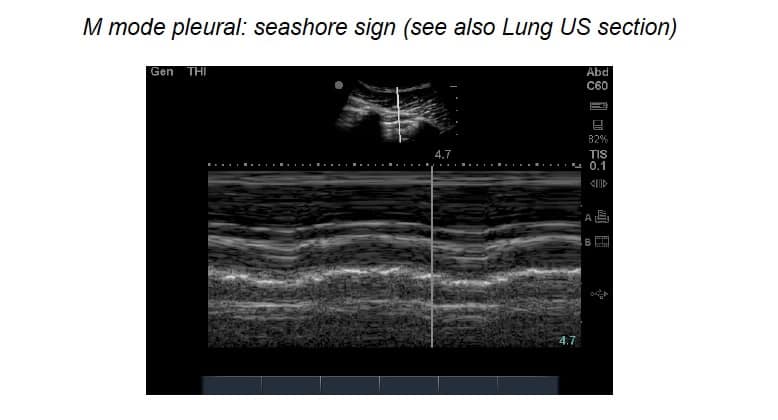
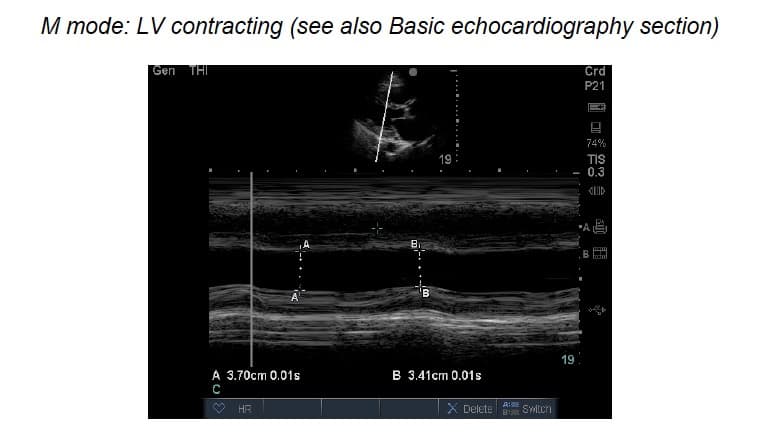
6. M-mode imaging = motion mode. What’s the point?
- ‘Surely 2D image is adequate’
- M-mode (motion mode) = movement along a single line of info against time
- Theoretically, a single line gives much better sensitivity & resolution
How to do it:
- ‘M’ button once & a line appears (NB need to press twice on some machines)
- Use touch pad / track ball to move the line to area of interest
- Press ‘M’ again to plot a graph of what that line sees versus time
- Stationary stuff = straight line
- Moving things = waves/ dots
 M-mode: pros & cons
PROS
- M-mode (motion mode) = movement along a single line of info against time
- Single line therefore much better sensitivity & resolution
- More accurate dimensions
CONS
- If angles wrong, measurements wrong!
- Easier to stuff up than B-mode
- IF IN DOUBT, USE B MODE
7. What about DOPPLER?
The Doppler effect
- Probe sends a sound wave of known frequency
- If it hits object moving towards probe, the returning sound wave is higher frequency
- If object moving away, the returning wave is lower frequency
Types of Doppler
a) Continuous wave [CW] Doppler
e.g. good old ‘ankle brachial index’ machine: very sensitive but won’t tell you what point the signal’s coming from!
b) Pulse wave [PW] Doppler
The machine sends ‘packets’ of sound waves & waits for each packet to return before sending the next packet. Less sensitive, but locates the site of the signal. PW has 3 variations:
- Colour flow (CF)
- Spectral
- Power
c) Colour Flow [CF] Doppler
Remember the BART convention (Blue Away, Red Towards)
• Red = towards probe
• Blue = away
Problems with Doppler
Dependent on
- Angle of insonation
- Pulse repetition frequency
- Operator skill & experience
For example, aliasing is a common problem; As velocity increases, signal alters (e.g. in CF Doppler = lighter shade) until aliasing occurs = then colour reversal occurs [see figure below]
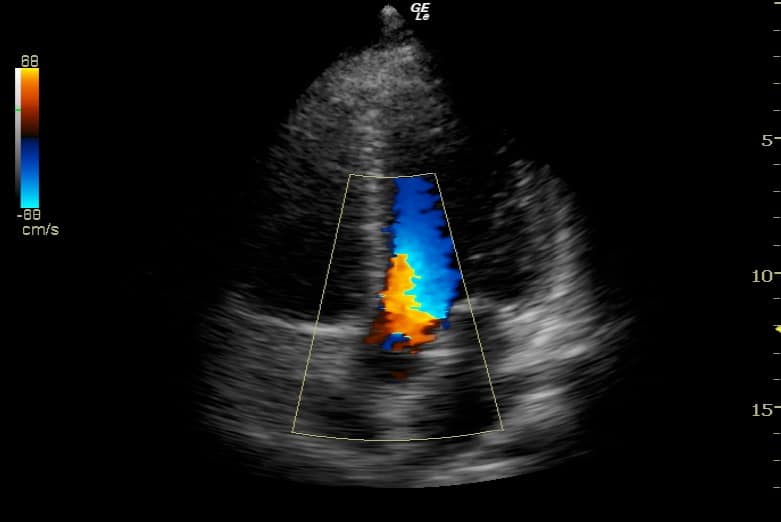
- Which way is the flow in this image?
- Towards the probe (red)?
- Away from the probe (blue)?
- Is this turbulent flow (e.g. valve disease) or aliasing (due to normal high velocity jet from LVOT into AV)?


